Table Talk: How To Set Up a Turntable
- today
- label Hi Fi
- favorite 30 likes
- remove_red_eye 2596 views
Table Talk: How To Set Up a Turntable
ACROSS THE CONTINENT, thousands are taking part in an almost-forgotten rite. It melds advanced technology, knowledge handed down through the decades, and a little dose of black magic. As most rituals do, it appalls many nonbelievers, but that fact only makes its practitioners relish it more.
Many rituals fit this description: home blacksmithing, heirloom chicken breeding, even Wiccan spell casting. But since this is Sound+Vision, we'll focus on an even more arcane and puzzling rite: turntable setup.
Decades ago, the average American bon vivant may have known what all those adjustments on his record player did, but this knowledge now resides mainly in the heads of serious audiophiles. Fortunately, turntable setup requires nothing more than manual dexterity, patience, and a few basic tools. And it can pay off in a much-improved vinyl experience (not to mention a sense of personal satisfaction, the envy of your friends, and - of course - a useful skill you'll have forever).
One thing to keep in mind: even some pretty expensive turntables, such as the Rega RP6, lack some basic adjustments. So if your turntable doesn't offer every adjustment we discuss, don't sweat it - just skip to the next step.
Ready for a better-sounding turntable?
Let's get started.
1) Level the turntable
It’s difficult or impossible to get good performance from your turntable if it isn’t level. To level the table, place a spirit level (like the Clearaudio model seen here) atop the platter, then adjust the turntable or your equipment rack’s feet until it’s level. If your turntable or equipment rack doesn’t have adjustable feet, shim under the rack or turntable’s feet until you get it level.
2) Install the cartridge
You can’t do any adjustments until the cartridge is in place. Almost all good tonearms use a standard half-inch mount, which uses two (occasionally three) tiny bolts to secure the cartridge to the headshell at the end of the tonearm. Some cartridges have threaded holes for the bolts, and for these you just need a tiny screwdriver to mount the cartridge. Other cartridges mount with nuts and bolts, in which case you’ll need something to hold the nuts while you’re tightening. I use a tiny socket, holding it in my fingers instead of using a spanner, but you can also use needlenose pliers.
Tighten the bolts so that the cartridge is secure but can still slide around a bit on the headshell. Now carefully — very carefully — attach the color-coded tonearm wire leads to the corresponding pins on the cartridge. I prefer to do this with my fingers, to make sure I don’t break any of the fragile parts, but I sometimes need a pair of tweezers to get the wire terminals onto the pins. If the terminals won’t fit, use a toothpick to ease them — carefully — open just a tad.
3) Set the vertical tracking force
Vertical tracking force (VTF) is the force of the stylus pressing against the record. Too little and you’ll get distortion and/or skipping. Too much and you’ll prematurely wear out your stylus. The cartridge manual will tell you the proper tracking weight range for your cartridge.
To adjust VTF, you need a tracking force gauge. Some manufacturers, notably Pro-Ject, include a basic gauge with their turntables, but in my opinion the Shure SFG-2 mechanical gauge (seen in use here) is way better and well worth the €50 I paid for it. You can also opt for an electronic gauge, which will be more accurate but more expensive.
Before you set the tracking force, remove the stylus guard. Now “float” the tonearm by moving the counterweight at the rear of the arm until the arm and cartridge can fl oat smoothly across the platter without touching it. Some tonearms have a tracking force scale, marked in grams; if yours does, you’ll want to make sure it’s set to zero when the arm is floated.
Place the gauge on the surface of the platter (without a record on it) and gently increase tracking force by moving the counterweight slightly toward the cartridge. Many counterweights adjust by twisting around the tonearm. Measure the tracking force, and readjust the counterweight until it’s within the specified range. If your tonearm has scale markings for tracking force, you can use them to set VTF, but it’s a good idea to double-check it with a gauge.
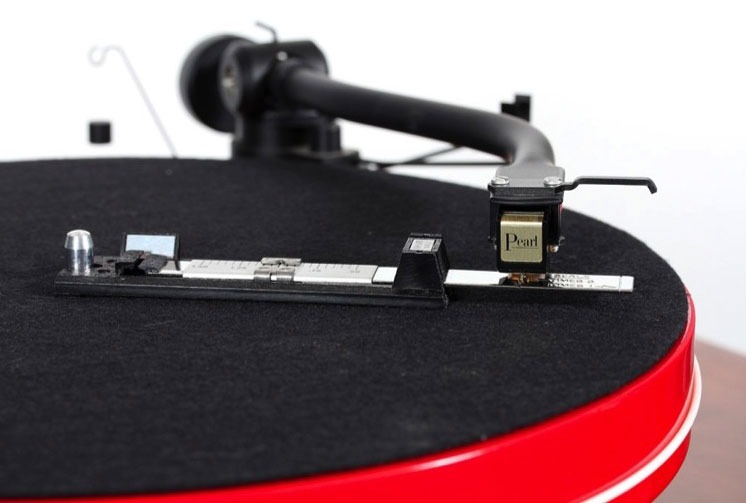
4) Align the cartridge
If your tonearm has a standard cartridge mount, you can move the cartridge around under the headshell. This allows you to align the cartridge. You align it at two points, moving it around slightly until you get the best compromise alignment. To do this, you'll need an alignment protractor. Many turntables include one, and you can also download one for free from vinylengine.com and print it out.
Place the protractor over the spindle as we've done here; if you downloaded and printed your protractor, carefully punch out the center hole and slide it down over the spindle. You'll see two targets on the protractor, surrounded by lines or grids. Position the tonearm and cartridge over one of the targets. Now gently move the cartridge around until the stylus touches down right on the target and the cartridge body aligns with the lines on the protractor.
Move the tonearm and cartridge to the second target and see if the stylus hits the target and lines up with the protractor grid or lines. If it does, tighten the cartridge bolts slowly, gently, and firmly, being careful not to move the cartridge while you're tightening. Get the bolts tight, but don't crank down too hard on them or you could break the headshell or the cartridge.
If the stylus doesn't align on the second target, try slightly different positions with the cartridge until you find one that gives the best possible alignment on both targets.
5) Set the azimuth
Azimuth is the tilt of the cartridge around the tonearm's central axis. It affects the left/right channel balance. Usually azimuth is adjusted by loosening a setscrew where the tonearm meets the pivot, or where the headshell meets the tonearm.
The easiest way to adjust azimuth is to just eyeball it. Put a record on the turntable, then lower the tonearm gently down to the record. Look at the face of the cartridge and the stylus. Are they standing straight up? If not, lift the tonearm from the record, twist the headshell slightly, and lower the tonearm back down to the record. You can also use a shiny record and look for the reflection of the stylus; if the reflected stylus lines up with the actual one, you're good.
You can get geeky with azimuth if you want. I set it using test tones from The Ultimate Analogue Test LP and measuring the level of the tones at the left- and right-channel outputs of my phono preamp with my Neutrik NT1 audio analyzer. You could also use an oscilloscope, a voltmeter, or the €250 Fosgometer azimuth meter.
6) Set the vertical tracking angle
Vertical tracking angle (VTA) is the angle of the tonearm relative to the record. Usually the top of the tonearm should be parallel (take a look at the image here) with the surface of the record when the stylus is on it. VTA has to be readjusted if you change to a different cartridge, because cartridges come in a variety of heights.
On tonearms that allow VTA adjustment, there’s usually a set screw somewhere near the bottom of the pivot that lets you raise and lower the back of the tonearm. If the top of the tonearm doesn’t sit parallel to the surface of the record, loosen the set screw, raise or lower the back of the arm to level it, then retighten the set screw.
7) Set the anti-skating force
Anti-skating keeps the stylus from pressing unevenly on the inside half of the groove. On many tonearms, this is nonadjustable, or the adjustment is primitive (sometimes consisting of a string, pulley, and weight as seen here). It’s not all that critical, but it should generally be about the same as the tracking force. Some test records include an anti-skating test tone that lets you verify this adjustment by ear.
8) Recheck the VTF
This one’s simple: Go back to Step 3, check to make sure your adjustments didn’t throw off the VTF, and readjust if necessary.
9) Play, tweak, repeat
Where you take your turntable setup from here is up to you. VTA is a great place to start: Raising the back of the tonearm slightly will tilt the tonal balance toward the treble, and lowering it will boost the bass. Or you can do what I usually do: Get the adjustment within safe and sane norms, pour yourself a glass of bourbon, and then get those records out.
Article by Brent Butterworth
If you have any further questions on turntables please don’t hesitate to contact us here at Savins and we would be delighted to help.